
AllFreePrintables.com
Free Printable Bookmarks | Chore Coupons | Checklists | Seed Packets | Mother's Day Printables |Easter Printables | Christmas Printables | Valentine's Day Printables | Halloween Printables | Kitchen Prints
Printable Paper Snowman Christmas Ornament
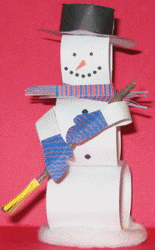
by Jane LakeAllfreeprintables.com All Rights ReservedOur little 3D paper snowman comes complete with scarf and mitts - all you need to add is the glue, a twig for the broom, and a cotton cosmetic circle or white cardboard circle for the base.
What You Do:
Click on the miniature template shown at right to see the full size version and print it out.
Cut out all pieces. Beginning with the face rectangle, use a glue stick to form the rectangle into a circle by gluing one end to the other. Repeat with the buttons rectangle, then with the largest rectangle which forms the bottom of the snowman. Using the glue stick or transparent tape, attach all three circles together, to form the snowman body.
Cut fringes on either end of the scarf, using about 6 cuts per end. Apply glue on the back of the scarf up to the fringes, then wrap around the neck area, allowing the fringes to stick out on either side. Gently hold the scarf in place for a few seconds until the glue sticks.
Glue the mittens to the ends of the thin arm rectangle. Using glue or tape, attach the arms to the second body circle, approximately level with the top button.
You will need a small twig - about 3" long, for the broom. The yellow pattern piece will form the bottom of the broom. Cut along the orange lines to make a fringe, then apply glue on the top area and roll tightly around the bottom end of the twig. Allow the twig to extend most of the way down the paper pattern to give the broom end more substance than the paper alone.
Now apply glue to the twig and the back of the mittens and position both mittens on the twig as shown in the photo.
The hat is a little tricky, especially for younger children, who may need help from an adult for this part.
Glue one end of the black rectangle to the other to form a circle for the hat brim. Now snip along the white indicator lines on each side, to make tabs approximately 1/8" long. You will have to cut just beyond the lines. When all lines are cut, bend the top tabs inside the hat brim and apply glue. Apply glue as well to the back of the small black circle and position it on these tabs to make the hat top. Allow to dry. If the top circle extends beyond the tabbed brim, once it is dry you can trim it to fit.
Now apply glue to the bottom tabs, and to the large black circle (the hat bottom) where the hat top will sit. Attach the two together together and allow to dry.
Glue the hat to the top of the snowman's head.
Glue the snowman to a base. A cosmetic cotton puff works well, as does a circle of white cardboard.
Suggestions:
If you want to make a variety of snowmen, use the printable snowman template as a guide, and cut out blank shapes for the face, scarf, mitts, and hat. Color or decorate as desired. Instead of the broom, you could make a small cardboard music "book" for the snowman to hold, and draw on a snowman face with an open mouth to appear as if the snowman is singing. Have fun with your 3D paper snowmen!